Magnet permeability meter FerroPro compact
Convenient and robust instrument for measuring the relative magnetic permeability µr between 1 and 5

Paramagnetic materials up to permeability µr=5
The List-Magnetik FerroPro compact permeability measuring device can determine the relative magnetic permeability (µr) of materials and structural parts within the range of 1,000 to 5,000. It is ideal for testing materials, especially ferromagnetic materials, to provide precise NDT (non-destructive testing) data.
Low magnetism - permeability and remanence
Magnetic permeability indicates how strongly a material can be magnetized. This information is particularly important when magnetism is undesirable, as with stainless steel. Permeability plays an important role in material testing because it reveals a material's magnetic properties.
It is important not to confuse permeability with remanence or residual magnetism. Remanence describes how strongly an object is magnetized, while permeability indicates a material's ability to adapt to a magnetic field, i.e., its magnetizability.
Permeability (μ) is the ratio of magnetic flux density (B) to magnetic field strength (H), and relative permeability (μr) is μ divided by the magnetic field constant (μ₀). μr is often used in non-destructive testing (NDT) to determine the magnetic properties of materials.
Why do you need permeability measurement ?
Areas of application include quality control of stainless steels, non-destructive testing of structural materials, and selection of materials for electron/ion physics equipment, nuclear resonance devices, and highly stressed parts. Non-destructive testing (NDT) plays a central role in precisely analyzing material properties without damaging the material's structure.
Calibration standard - an important accessory for the magnet permeability meter
You can use the supplied calibration standard to check the accuracy of your measurements at any time. The calibration standard has a value of µr ~1.35. Additional calibration standards with µr reference values of ~1.03 and ~1.10 are available. The device is calibrated to precise reference standards that are traceable to the Physikalisch-Technische Bundesanstalt (PTB) in Braunschweig. Recalibration is easy, and a calibration standard is included with each device.
The magnetic permeability of a material typically varies greatly depending on the strength and frequency of the magnetizing field. The FerroPro compact probe can be adjusted to different excitation field strengths. The FerroPro Compact can perform standard-compliant permeability measurements according to ASTM A342 Test Methods 1 and 4, EN 60404-15 Method 6, and VG 95578. This method is often used in NDT (non-destructive testing) materials testing to accurately measure the magnetic properties of materials.
Spot measurement and scan function
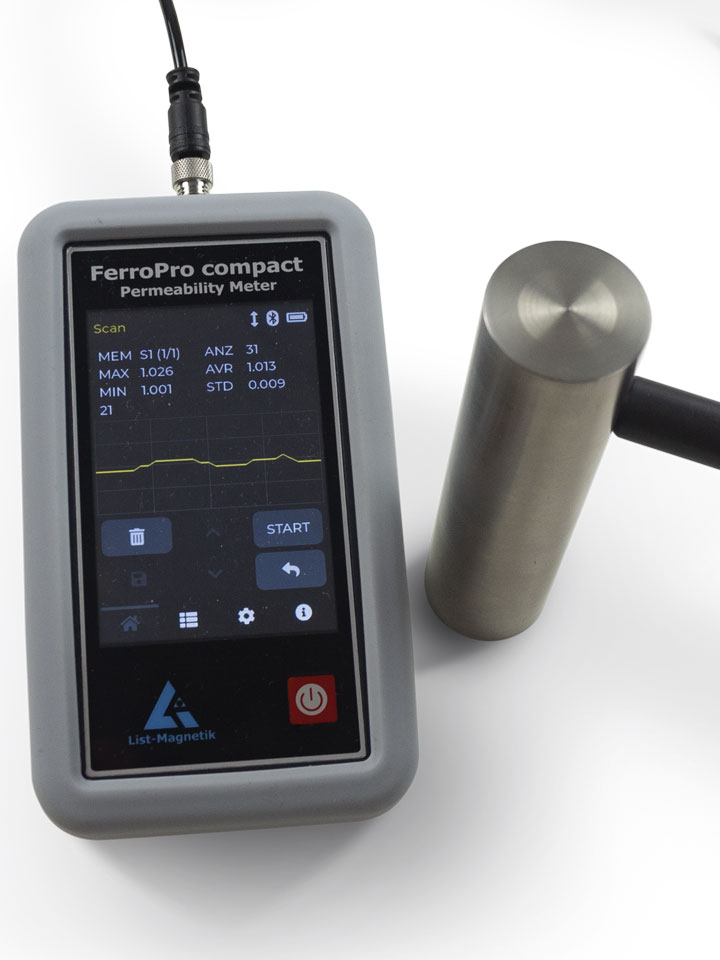
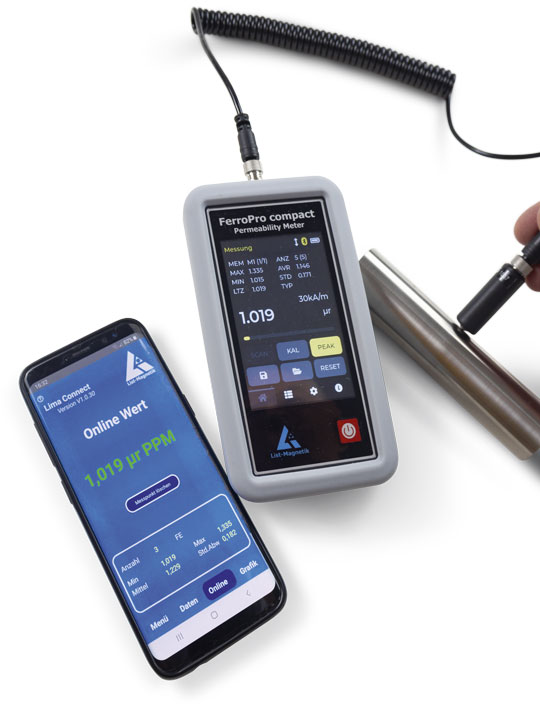
The FerroPro Compact features a graphic LCD touch panel with an innovative user interface and a resolution of 320 x 480 pixels. The scan function allows you to scan a workpiece across its surface and provides a statistical evaluation of the data. An additional analog display supplements the visualization of the measured values, making trends and peak values immediately visible.
Scan Measurement |
Data logger and Application |
|---|---|
| Do you want to continuously scan a workpiece and determine the minimum and maximum values? The scan measurement provides you with a graphical permeability curve with statistical evaluation. | Do you need to generate a report of the permeability measurement? With the Lima Connect app you can read out the device memory and process and send the data. |
 |
 |
Interfaces and operation
With its flexible measured value memory, combined digital and analog display, and peak value measurement, the device supports all applications involving permeability measurement. Data can be transferred to a Windows PC or the Android or iOS app via the wireless interface. The device can be connected to an external power source for continuous operation via the USB interface.
The device has an SCPI interface, which allows it to carry out remote-controlled measurements and deliver measured values in line operation. The connection is made via USB, which ensures a continuous power supply and operation.
Limits of accuracy in permeability measurement
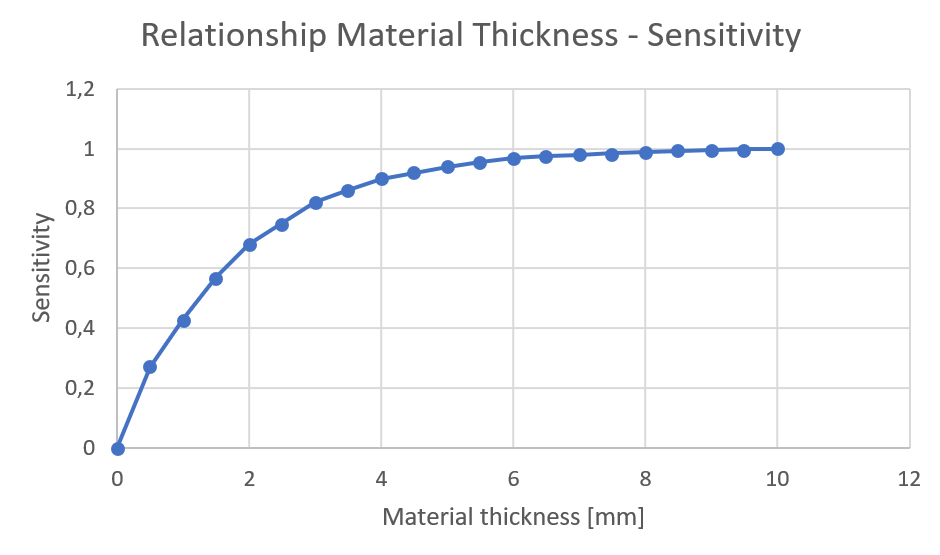
The measured permeability value depends on the dimensions of the small material samples. The device's sensitivity increases with the material's thickness. Once the material is about 5 mm thick and 2 cm wide, the measurement becomes independent of its size.
The approximate dependence of sensitivity on thickness is shown in the diagram. Sensitivity is calculated as (µr displayed − 1)/(µr true − 1). This calculation is particularly relevant for material testing and is often used in NDT (non-destructive testing) to enable precise measurements of magnetic permeability in materials of different thicknesses and sizes.
Measuring ranges of permeability meters – Paramagnetism
Magnetic materials can be classified by their permeability number.
Diamagnetic materials have µr values between 0 and 1.
Paramagnetic materials: μr > 1.
Ferromagnetic materials: μr ≫ 1.
Measurements with List-Magnetik permeability meters can only be carried out on paramagnetic materials. Aluminum, chromium, platinum, and stainless steel are examples of paramagnetic materials. The value µr for stainless steel depends on the alloy.
Ferromagnetic materials, such as iron, nickel, cobalt, and various alloys, have a permeability number significantly greater than one and can assume values greater than 100. These materials considerably increase the magnetic flux density of a magnetic field. List-Magnetik's permeability measuring devices are not designed for this purpose.
A short video tutorial on the use of the device
|
FerroPro FP-5 vs. FerroPro compact |
|---|
|
Advantages over the laboratory instrument FerroPro FP-5 are the compact design as a handheld instrument as well as additional functions such as scan measurement and analog display. In addition to the Windows interface, the FerroPro compact offers an interface to mobile devices. |
Manage and send measurement data with a free application
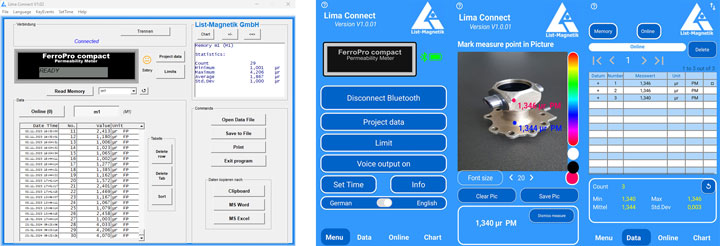
To further process your measurement data, you can pair your measuring device with mobile Android and iOS devices. Or you communicate with a Windows PC. This is made possible by wireless technology. With the Lima Connect app you can manage projects and assign the measuring points on a photo. The measurement results can be statistically evaluated and displayed graphically. The app for Android, iOS and Windows is free.
Models and scope of delivery Magnet permeability meter FerroPro compact
| LM-FERRO-PRO / Model FerroPro compact with measuring probe FPC-5, calibration standard (~1.35), probe cable and case, including calibration certificate |  |
 |


